How to Take the Perfect Photo for Your ID
Master the art of ID photography with our comprehensive guide. Learn professional techniques for lighting, composition, and technical requirements to create authentic-looking ID photos.
Why Photo Quality Matters
Your ID photo is the most scrutinized element of any identification document. Professional quality photos not only look more authentic but also pass various security checks and human inspection.
Modern ID verification systems use advanced algorithms to detect inconsistencies in photo quality, lighting, and composition. This guide will teach you how to create photos that meet these professional standards.

Camera & Equipment Setup
Smartphone Camera
Modern smartphones (iPhone 12+, Samsung Galaxy S20+) provide excellent quality for ID photos. Ensure your lens is clean and use the rear camera for best results.
- 12+ megapixels minimum
- Clean lens surface
- No digital zoom
Digital Camera
DSLR or mirrorless cameras provide the highest quality. Use a standard lens (50mm equivalent) and manual focus for precise results.
- 16+ megapixels recommended
- Manual exposure control
- RAW format capability
Stability
Camera shake creates blur that's immediately noticeable. Use a tripod or stable surface, and enable timer mode to avoid movement.
- Tripod or phone stand
- 3-5 second timer
- Remote shutter (optional)
Perfect Background Setup
- Plain white wall
- No shadows
- Even lighting
- Smooth surface
- Busy patterns
- Visible objects
- Strong shadows
- Wrong color
Background Requirements
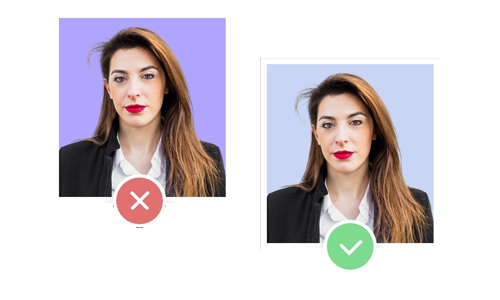
Official ID photos require a plain, solid-colored background with no patterns, textures, or shadows. The background should be light-colored and provide good contrast with your clothing.
DIY Background Options
Home Solutions
- Clean white wall (most common)
- White bedsheet stretched tight
- Poster board from office supply store
- Photography backdrop (professional option)
Professional Lighting Setup
Lighting is the most critical factor in creating a professional-looking ID photo. Poor lighting can create shadows, alter skin tone, or make your photo look amateurish.
Lighting Principles
Natural Light
Position yourself facing a large window with soft, indirect sunlight. Avoid direct sunlight which creates harsh shadows.
Best time: Mid-morning or late afternoon
Artificial Light
Use soft, diffused lighting from multiple angles. Ring lights or softbox lights provide even illumination.
Color temp: 5500K-6500K (daylight)
Eye Level
Position your main light source at eye level to create natural-looking catchlights in your eyes.
Angle: 45° from camera for best results
- Overhead lighting (creates eye shadows)
- Backlighting (darkens face)
- Direct flash (harsh shadows, red-eye)
- Mixed color temperatures
- Insufficient light (noise/grain)
Perfect Facial Expression
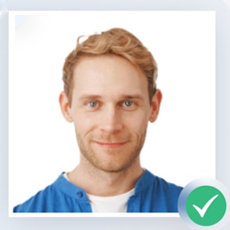
Neutral & Professional
- Relaxed, neutral expression
- Eyes open and visible
- Mouth closed or slight smile
- Looking directly at camera
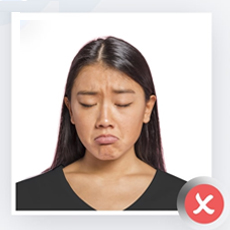
Too Expressive
- Wide smiles showing teeth
- Frowning or serious scowls
- Eyes closed or squinting
- Head tilted or turned
Clothing & Appearance Guidelines
Clothing Guidelines
Color Choices
- Solid, neutral colors (navy, black, gray)
- Contrast with background
- No busy patterns or logos
- Avoid white shirts with white background
Professional Style
- Collared shirts or blouses preferred
- Conservative necklines
- Well-fitted clothing
What to Avoid
- Hats, caps, or head coverings*
- Sunglasses or tinted glasses
- Face masks or coverings
- Uniforms or work clothing
- Sleeveless or revealing clothing
*Religious head coverings may be acceptable with proper documentation
Grooming Checklist
- Hair neat and not covering eyes
- Natural makeup (avoid heavy application)
- Minimal jewelry
- Well-groomed facial hair (if applicable)
Photo Dimensions & Formatting
Technical Specifications
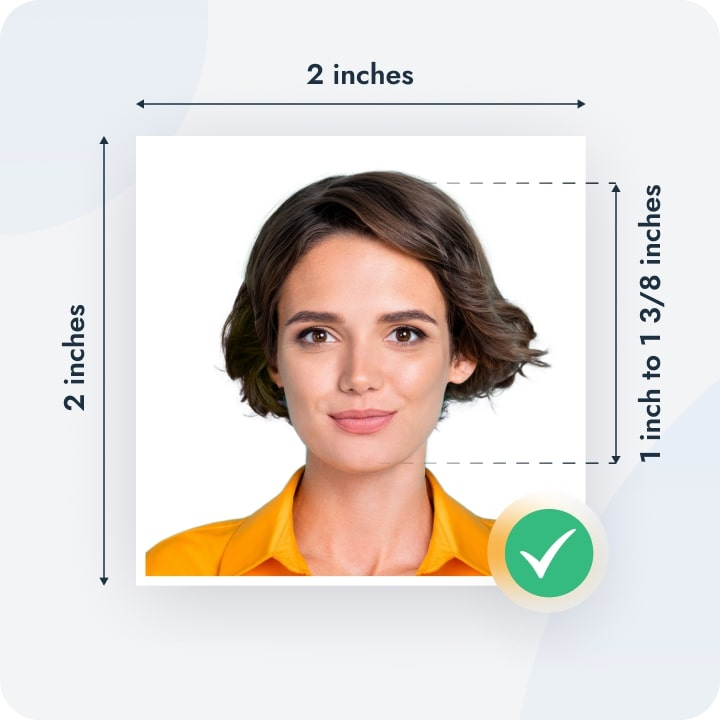
| Specification | Requirement |
|---|---|
| Size | 2" × 2" |
| Resolution | 300+ DPI |
| Head Size | 1" to 1⅜" |
| Format | JPEG, PNG |
Editing Tools
Free tools to help crop and format your photo:
- 123PassportPhoto.com - Free online cropping
- Passport Photo Maker - ID-specific templates
- Adobe Express - Professional editing
- GIMP - Free desktop software
Essential Dos and Don'ts
-
Take multiple shots
Capture 5-10 photos to choose the best one
-
Use proper lighting
Soft, even illumination on your face
-
Keep eyes open and visible
Look directly at the camera lens
-
Maintain proper posture
Head straight, shoulders square
-
Use selfie mode
Selfies distort facial proportions
-
Wear accessories
No glasses, hats, or jewelry visible
-
Over-edit the photo
Filters and heavy editing are detectable
-
Rush the process
Take time to set up properly
Frequently Asked Questions
Final Checklist
Before Taking Your Photo
After Taking Your Photo
Ready to Order Your Professional ID?
Apply what you've learned and get a premium quality ID that meets all professional standards.
Join over 50,000 satisfied customers who trust TopID